

How To Draw Facial Features How To Draw Realistic Facial Features
The hardest office of nailing down a face is using the right proportions. Once you get that part, drawing faces will be easy peasy!
For me, the hardest part was always drawing the eyes in the right size and right place. We expect at drawings or photos and information technology looks and then easy, but then, when information technology's our turn, everything is 10x harder.
Like in everything, it all comes downwardly to exercise. Start with shapes, acquire the proportions.
Do this a few times and, yous'll see that, soon, drawing just the head will be every bit piece of cake as tying your own shoes!

Of class, I'm going to assistance you out and give you a step-past-step process on how to draw a face. From Basic Shapes and each feature of the face, like the eyes, nose, mouth, etc. Adding details, young and old faces and even drawing the confront in different views!
Buckle up and go your sketchbook ready. We're doing this!
What You Need To Know About Drawing Faces
Information technology's all nigh the shapes. Everything in a drawing is virtually shapes.
You look at a face up as its whole. But I'll look at information technology and I'll try to figure out into what shapes can I put it down, so I can easily describe information technology.
Circles, squares, rectangles and guidelines, a puzzle for me to figure out.
Like I said, nosotros're going through a step by step guide for each characteristic of the confront.
I'm going to show yous the process I utilise when learning to describe new things and hopefully, it will be nearly useful to you!
You can do this with whatever medium yous'd prefer.
Either with a sketchbook along with some pencils or fifty-fifty pens or grab your drawing tablet and pc. Anything will work, you but need to come up along with your motivation and first.
Basic Face Proportions
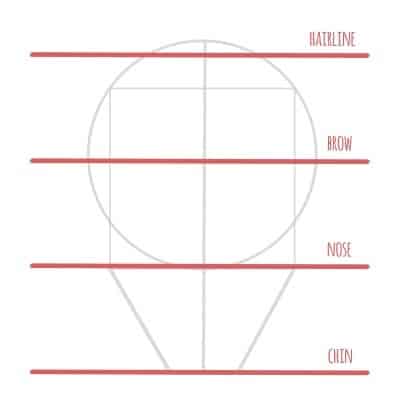
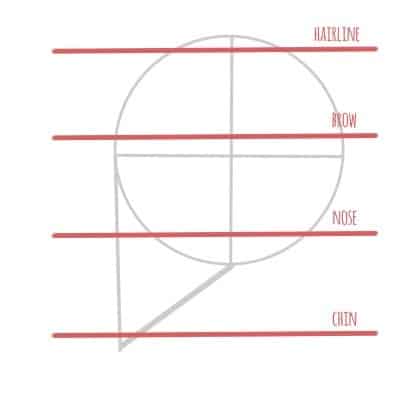
Generally speaking, we're dividing the face into 3 equal parts.
Later drawing our main shapes of the head, we demand to be certain that everything will be in the right places.
For this, there are iii chief spaces you might want to add:
- one goes from the hairline to our brow
- another from the brow to the olfactory organ
- and finally, nose to mentum
This might sound disruptive, only here's an example:
Now, all we are missing is where our eyes, ears, and mouth volition be.
But we'll get at that place in a 2d, so follow me and nosotros'll build up our caput and face, ane footstep at a time!
Complete Step by Pace Guide on Cartoon Faces
If you'd similar to see all of this and much more on Figure Drawing in video format, bank check out my premium course on Gumroad!
Either mode, before nosotros begin:
Practice your hand stretches, organize your workspace, bring some water and snacks if you wish to. The form will begin presently!
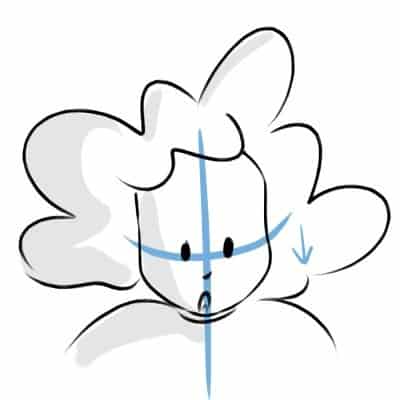
Draw The Basic Shapes
Alright, let's first very uncomplicated.
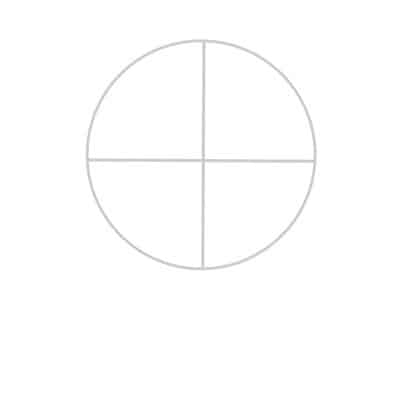
On your page, draw a circle. If yous find it difficult to draw a perfect circle, hither's a tip: draw a horizontal and vertical line, perpendicular to each other, crossing at the eye.
If you prefer, employ a ruler. Simply I'd say to do this without information technology. Your lines don't demand to be 100% perfect and equally you practice, you'll see that they'll become better with fourth dimension.
At present that you lot take your lines, draw the circumvolve around them.
Alternatively, yous can but do a few circles on your page until you get the hang of it. Offset with smaller circles and increase their size equally you lot go.

Now the next step is to draw a foursquare within our circumvolve.
This might sound weird, only this square volition make up one's mind the width of our face.
Nosotros're doing a pretty default face at the moment, only subsequently on, we'll talk nigh how yous can use your shapes, to draw dissimilar faces!
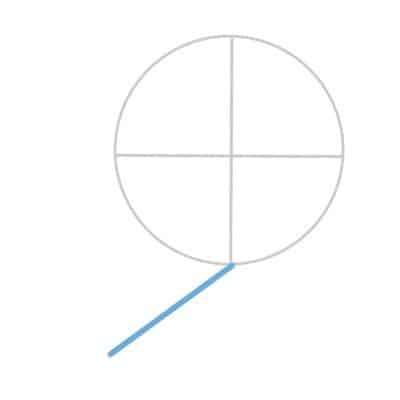
Alright, one-half of our head is washed, now nosotros need to find our chin.
Draw a vertical line, post-obit the one you did for the circle, going down, with the same altitude equally the upper half of the confront.
Where the line ends, that'due south where our chin will be!
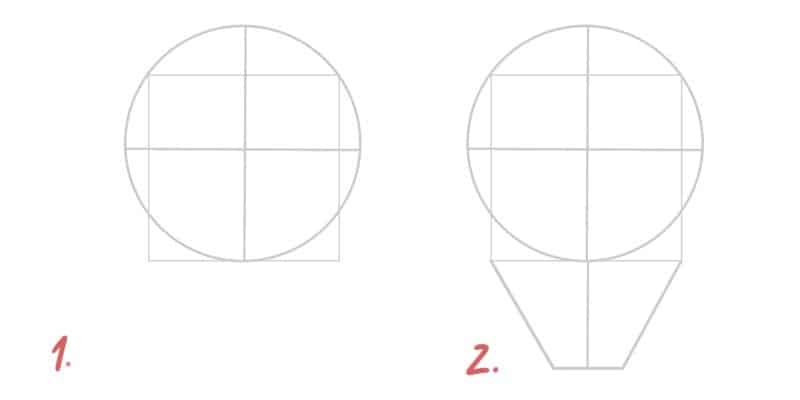
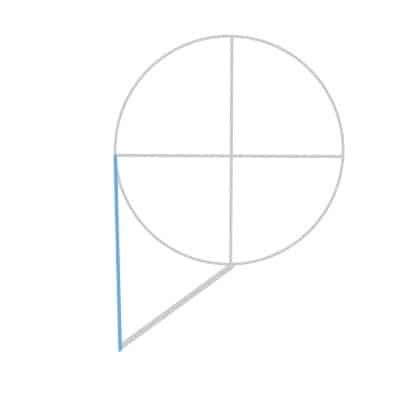
Now, all we demand is to connect the points and we have our head done. Adjacent all we demand to add is our guidelines for all the features.
Pretty unproblematic right?
Now you just need to exercise this shapes and, gradually, yous'll start losing some guidelines, because you don't need them anymore. Intuitively you'll already know where everything is!
Draw The Eyes and Eyebrows
It'southward time to start calculation features to our face.
Let's start from meridian to lesser.
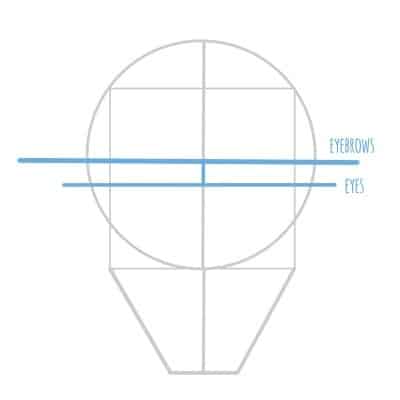
Our quest at present is to discover where our eyes and eyebrows volition be. Permit's take a look at what we have so far.
Now, for the eyebrows, our line is already there. Our forehead line is where we'll draw the eyebrows.
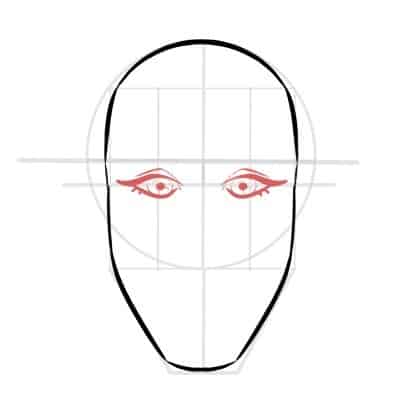
For the eyes, there isn't much for u.s.a. to do here either.
Get a scrap beneath the eyebrows and make a new line, this is where the optics volition be.
The Eyes
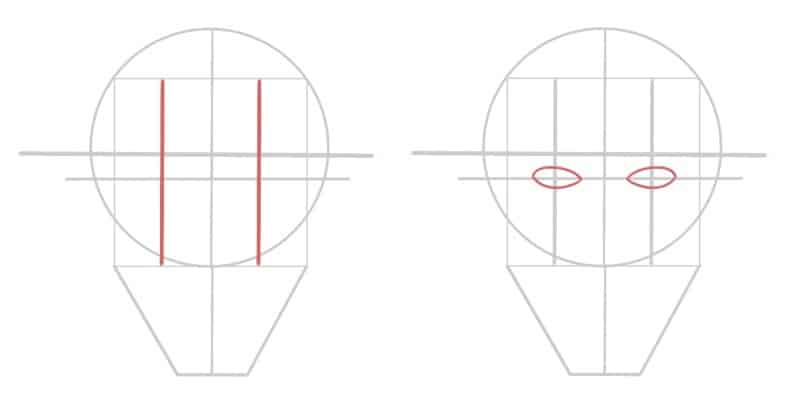
To help you on their location, nosotros tin add some guidelines here as well.
Call up that square nosotros drew at the first? Let'southward divide each one-half of the foursquare in two.
Ii vertical lines, going down. These lines make up one's mind the center of each heart.
Now, all nosotros need to practise is to add together our eye shapes in their places.
Either an oval and almond shape will piece of work. See what works best for you lot.
Our next step is to fill our eyes.
Add together the pupil and iris, the upper eyelid and some eyelashes if you wish!
Y'all tin practice these as stylized every bit you want or keep it very simple.
More cartoonish or more realistic. Endeavor out different things and experiment!
While you're learning and improving your faces, you're as well developing your own style and discovering what and how yous like to draw!
The Eyebrows
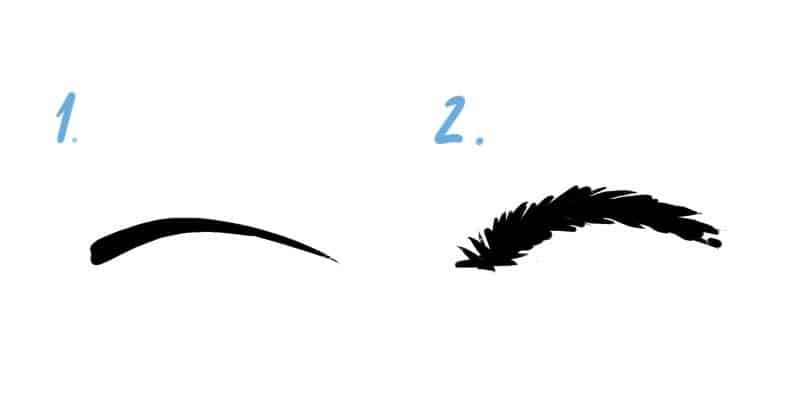
The eyebrows can be very unproblematic or full of detail.
It all comes downwardly to your sense of taste and manner. I tend to draw my eyebrows with a single line. But, if you adopt, you tin draw them, hair past hair.
So, of course, you lot can go with several styles, from very tiny to very thick and bushy eyebrows.
As their place, we draw them correct higher up the eyes, the line resting in that location is our guideline.
They can go a fleck further than the eyes, only the starting point is the same.
Usually, I get-go from inside the face, I feel that it's easier to go from there.
We draw an arched line, turn it around and we close our shape where nosotros began. Remember that the eyebrows are thicker on the inside and get thinner on the ends of it.
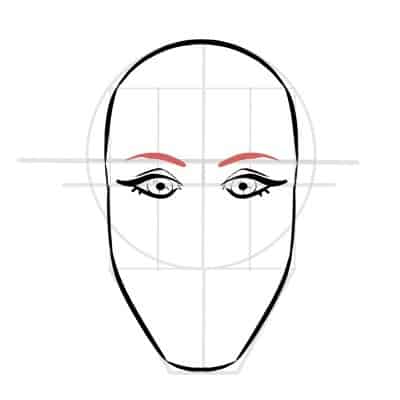
Lovely, the face is starting to expect slap-up!
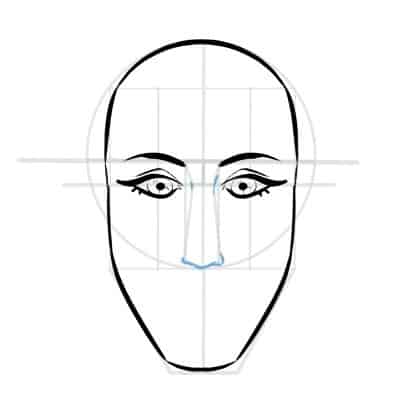
Draw The Nose
Next in the list is the nose.
Nosotros already know where information technology ends, our second guideline, after the brow. But where does information technology begin?
Don't worry, nosotros don't need to add more lines… yet! Our nose starts at the same line equally our eyebrows.
As for its width, it will go as far as the starting bespeak of our eyes. Let'south do some base shapes start:
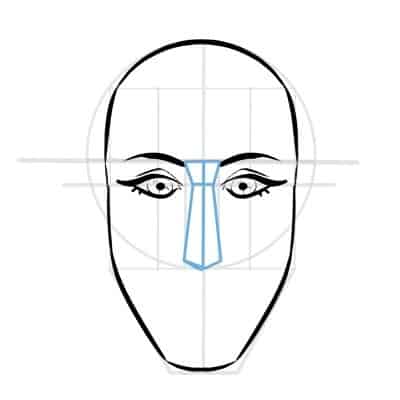
At present nosotros just need to sketch out our nose.
In that location'southward a variety of styles yous can go well-nigh here. I cover, in a video, the main ones you lot can do, so if y'all're interested, cheque out my Figure Drawing class on Gumroad!
As for the size of the nose, these are only guidelines, feel gratis to exaggerate your noses or optics as you lot wish. Peculiarly if you're doing a more than cartoonish style!
Draw The Rima oris
We're almost done!
For the mouth, we don't have whatsoever guideline withal, so let's get-go with that.
Discover the eye point betwixt the olfactory organ line and the mentum. Now draw a horizontal line.
We found our mouth!

Now in a higher place this line, we'll accept our upper lip and beneath, the bottom lip.
Again, at that place are several types of lips, thinner or thicker, long lips or very small. Just the default shapes are an K shape for the upper lip and an arch for the bottom.
Like this:

Again, try out different styles and shapes.
Experimenting is always the best part of drawing, then have fun with it!
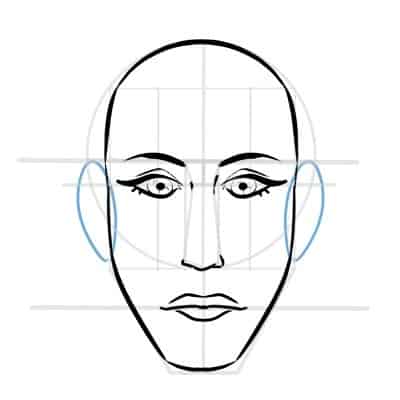
Draw The Ears
We've reached the last stride of cartoon the face.
All we are missing at present is the ears!
I admit, drawing ears in a front view isn't the most entertaining, merely information technology is as well very elementary.
Every bit for their location, very easy also: draw an oval shape, starting in our eyes line, its highest point rests on the forehead line and everyman point on the olfactory organ line.
And there it is, ninety% of our ear is down. Now we just need to add some details, mostly curves here and at that place:
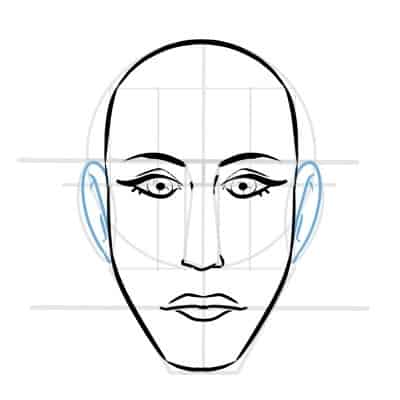
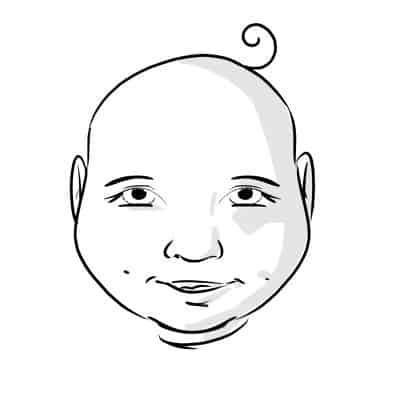
Well washed! That's a good looking face.
Adding Details And Aging
Now that you know how to draw a complete face, nosotros can add some details!
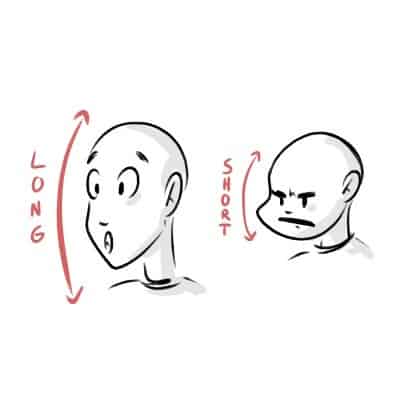
Depending on whether you lot're drawing a younger character or older, the face will look different.
An aging face will have some wrinkles for example!
Autonomously from that, in that location are other details you can add to give more personality to your character: moles, nascence signs, freckles, scars, among others.
If you're cartoon male characters, at that place'due south another addition for you: beards!
There are dozens of styles to go for: long, short, unlike designs, mustache only, beards only or a mix of both!
Details Can Make or Break Your Character
Don't overdo information technology though!
Details are nice, merely you can't hands use everything in i character. It can be likewise messy and confusing. Likewise, the point of calculation some details is so that people will recognize your character through unique details.
If y'all're unsure on how to go about your characters, try out different versions. Effort out several things and come across what yous recall works all-time with their personality.
Once you've chosen how your character will look, draw them in different poses, locations, actions and test them, so you're sure that's the look y'all want!
Drawing Old Faces
As I said before, if you lot want to depict someone older, you might want to add some wrinkles and fifty-fifty different colored spots and signs over the face.
As nosotros age, our peel changes. Use photograph references if needed!
The almost mutual wrinkles will bear witness on the eyes and around the mouth.
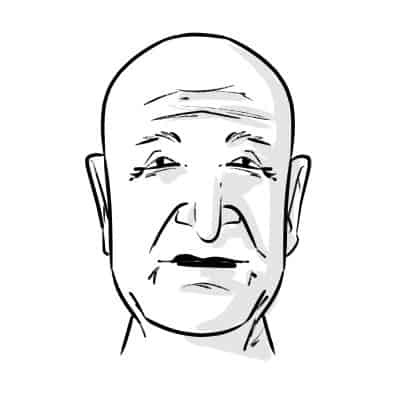
But, in one case again, feel free to exaggerate your lines! Even in real life, people age differently and volition await different!
Drawing Immature Faces
For young people, well at that place are several stages and there's a lot to play with!
Permit'southward say you desire to draw a baby or a child. Usually, nosotros go for really round shapes, the youngest, the chubbiest!
Play with those shapes as much as you desire.
Once more, look upwards some reference images and depict from them.
As for moles or freckles, those tend to appear a bit later.
The same goes for wrinkles, except, if y'all're going for a very chubby baby, then y'all tin can add together some lines on the forehead and very circular cheeks.
Children are a mix of babies and teens.
There'southward less roundness to their faces, but it'south still there.
When drawing both babies and children, we besides tend to depict very big eyes, near as well big. It makes them wait cuter and children's eyes expect always a chip bigger than when we're older and very vibrant.
Look for this kind of details on photographs from when y'all were a kid, for instance. Have advantage of these little features and exaggerate them in your drawings!
Equally for scars, well information technology's something you can start adding when cartoon both children and teens.
If your character is the adventurer and energetic type, then maybe a scar or other would fit. I for certain know some people where their scar's stories brainstorm with "When I was a kid…" and terminate with "And that'south how I got this i!"
Teens tin be really fun too.
This is when the terrible acne starts to appear! You can add some pimples if you think it fits your character.
On another notation: beards! At a sure age, boys start growing facial hair, so you can start playing with this thought likewise past giving them pocket-sized stubbles or random tiny hairs.
Experimenting With Shapes
Alright, so like I said before, nosotros drew our confront in a very default way.
Those are the proportions y'all want to go when drawing a realistic portrait. But if you're interested and going for a more cartoonish approach, yous can get beyond these proportions!
Exaggerate the sizes of each feature and try out different face shapes. Basically, the only thing that usually doesn't change is the position of each characteristic. Unless you're going for a Picasso approach of course!
Endeavour different shapes, a triangle for example!
Instead of a circle and foursquare, try to utilize a triangle. Either up or upside downwardly. See the results that yous get! A triangle volition probably give you a more than caricature style and a more elongated face.
If y'all actually want to play with a very long face, endeavor a rectangle or a very long triangle!
What about a pentagon? Either upright or inverted.
This one can give us very interesting confront shapes.

Yous already have your bases and now how to practise a face.
Now information technology's fourth dimension to experiment and try out different formats.
Is your grapheme a very sturdy man, perhaps a boxer? Then draw a very square face.
Are y'all drawing someone with a very big abdomen? Then draw a very round confront to lucifer!
There are thousands of options and you are complimentary to effort whatsoever you similar!
If y'all don't like the effect, effort once again or become with some other shape. You learn with these experiences and non simply you're learning unlike approaches when cartoon, you're also improving your drawing skills.
So, keep practicing and have fun with your characters!
Drawing Faces At Unlike Angles
We've done our confront in a front end view, but you might desire to draw your characters in other positions. Especially if you want to brand a turn around sheet of your character!
Worry not, for I will non exit you hanging!
Let's go through a few more than tutorials on how to depict faces in different angles.
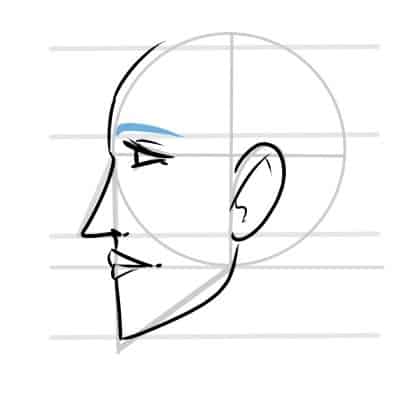
Side View
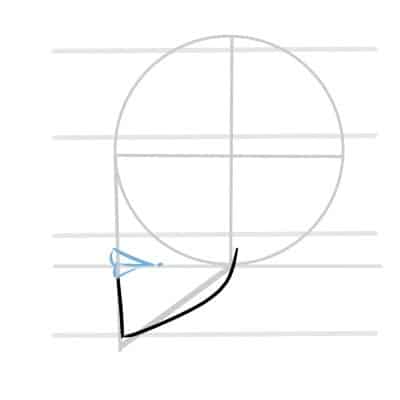
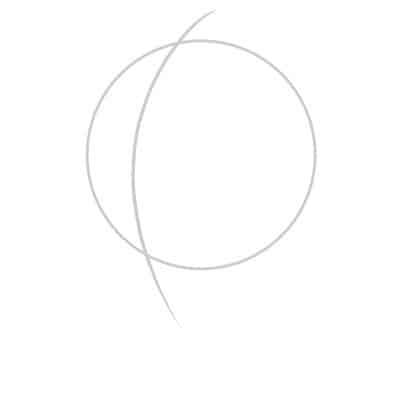
Our first shape here will exist the same as before. We start with a circle!
Again, if you wish, draw two lines, crossing each other in the center and then connect everything together. Actually, I'd say to draw your circle similar this, because you'll need them later.
They are very important guidelines!
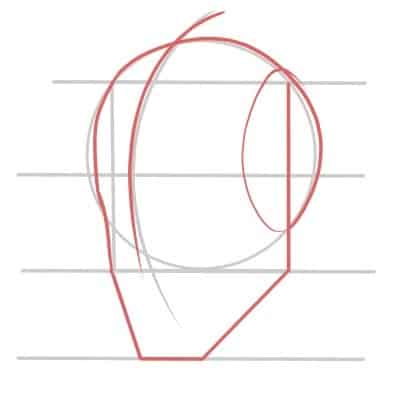
Alright, so we take one-half of our head done. At present, from the lesser of our vertical line, we draw an oblique line, like so:
This is our chin and jawline!
Finally, we just need to shut this shape. From the edge of our circle, on the right side, draw a vertical line until it touches the line we only did.
Our primary shapes are done.
At present it'south fourth dimension to get-go finding where each feature of the face is!
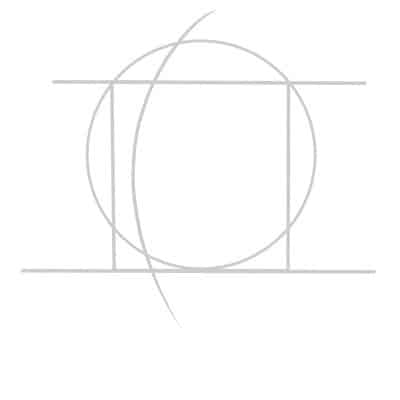
This time, nosotros're starting from the bottom. But earlier that, remember how nosotros divided the head into three equal parts before? Allow's do the aforementioned here!
Now that'southward washed, from the point where our jawline starts, let'south draw a horizontal line.
This is where our oral fissure volition be! At the edge of our caput.
Similar last time, the upper lip should be above this line and the lesser lip, below.
Unremarkably, the upper lip also goes a chip forrad than the bottom lip. Just once more, it all depends on how you want your graphic symbol to be!
Side by side, is the olfactory organ.
We already accept our line hither, where the terminate of the nose volition sit down. To aid you, earlier detailing and cartoon a finished olfactory organ, draw a triangle, going out of the head.
This is where your nose should go.
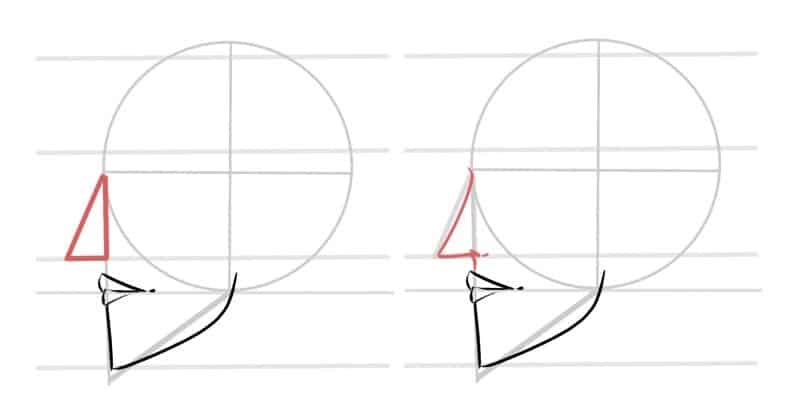
Before drawing the eyes, let'due south practice the ears first.
Since we're seeing the caput from only one side, nosotros tin can only run across one ear. Like before, the everyman part of the ear will seat on the guideline we did for the olfactory organ and the highest part touches the forehead line.
This time we can also come across more details of the ear.
I usually become for a very elementary ear, just experience complimentary to add all the curves that you see on your ear!

As for the eyes, we can as well see simply ane of them and its shape will besides be very different than earlier. Its placement is the same equally before, the central horizontal line on our circle!
For its shape, instead of a circumvolve or almond shape, we draw a cone.
Now we just demand to add details like the pupil, iris, eyelashes and a chip of the upper eyelid.
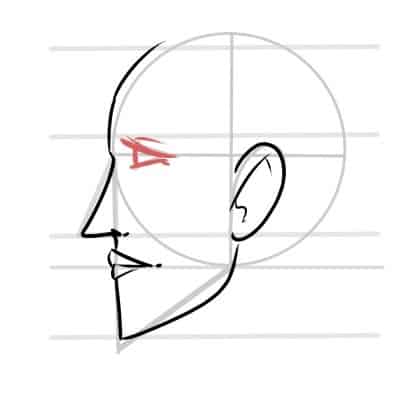
Nosotros're most washed and this last part is rather elementary!
We just need to add our eyebrow.
We already have a place for it and at present nosotros just need to draw an arched line, a bit more tilted in the front end and nosotros're done!
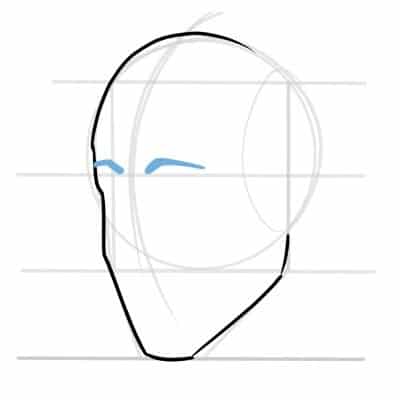
3/four View
This 1 is commonly the one that about people accept difficulty with. This is why I did a whole section with 10 videos on my figure drawing course, just for drawing a consummate caput in a 3/four view!
A office of the face up is hidden, but not completely, then getting the proportions right can be hard.
Let's start with our circle!
So far, nosotros've always been drawing straight lines, this time we need a curved i. From the meridian of the circle, going all the manner downwardly.
Now, to make things a bit easier, permit's describe a rectangle, starting from the hairline, downward to the nose.
This way we take almost a consummate shape of our head, plus two of our main guidelines!
Now, nosotros need to add our chin line, then from the olfactory organ line, go down the aforementioned distance as you have from the brow to the nose.
Finally, nosotros just need to connect the dots!
Time to make full everything upwardly!
Starting with the eyebrows, everything has a bit of a 3D feel correct now, so it'due south like we take arched guidelines. One of the eyebrows is completely seen, while the other is cutting.
The shapes are the same equally before though!
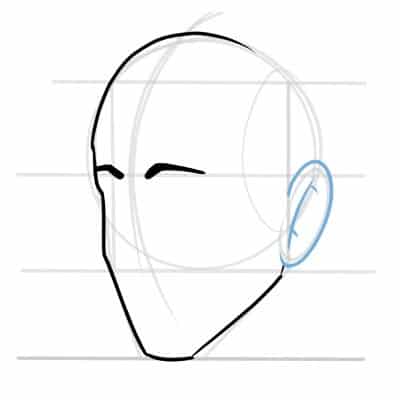
Let'south draw the ear now, then we can observe the line for our eyes.
This time, nosotros can but meet 1 ear as well. Depict an oval shape, where its higher signal touches the brow line and the lowest, the nose line. But like we practiced earlier!
Now just add together the details.
The ear here is done very similarly to when we drew it on a side view.
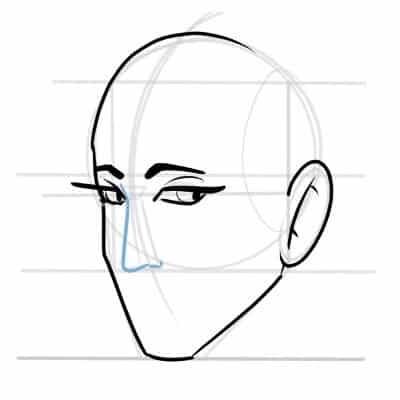
Next is the eyes, probably the one people accept the most problems with.
Its line goes right beneath the brow line, same distance, and identify every bit we did earlier.
Like in a front view, we draw almond shapes for the optics.
The heart that is uttermost from us is usually a bit hidden from the olfactory organ, so take that into consideration!

At present it'due south time to draw the nose.
We can only encounter one of the nostrils, so the shape here will exist a triangle, similar to the one we drew in a side view.
Similar I mentioned before, the olfactory organ is in front of one of the optics, and then be certain to draw that line on top, connecting to the eyebrow.
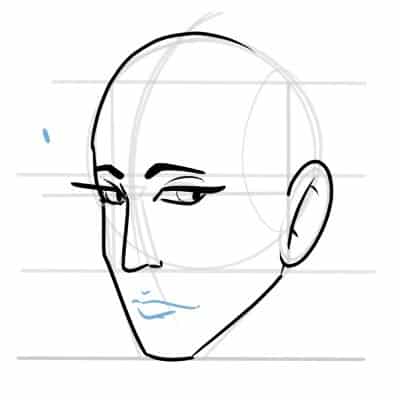
Finally, we draw the mouth, like to the one in the front view.
An "M" shape for the upper lip and an arch for the bottom lip.
The only difference here is that one of the sides of your lips will appear smaller since a office of the face is turned away from us.
Looking Up
Every shape is mostly the same when looking upwards, the only divergence hither is that we draw more arched guidelines, especially for the eyes.
I'm going to leave hither an case, and then information technology'south easier to sympathize!

Looking Down
Aforementioned every bit earlier, except that this time, our lines arch in the opposite direction.
Once again, allow's encounter what I mean by this with an example:
Dissimilar Expressions, Dissimilar Confront Shapes
Depending on what kind of expression yous're going for, the face will have different shapes.
For example, if you're cartoon a surprised character, optics growing big and a long "O" for the mouth, then the face volition await more elongated.
On the other hand, if you're cartoon someone angry, where the optics and eyebrows abound close together and a closed rima oris, possibly showing some teeth. Then we take the opposite effect.
Put yourself in front of a mirror and practice your expressions.
Take photos if yous demand to! Then, you'll have tons of references for you to utilize in your drawings. If y'all prefer, you tin can even trace on meridian of your photos, so yous can encounter clearly the differences in proportions and shapes, depending on the expression you're making!
Summing It Up
Uff, that was a lot of learning!
Merely, as you tin see, the of import parts you lot need to retain when drawing faces are proportions and shapes.
In one case you nail those down, everything else comes easily.
As e'er, practise a lot. In the beginning, practice only the shapes and guidelines if needed. After a few tries, you'll see that everything will come upward more intuitively.
If you prefer to run into these steps in video format, check my course on Figure Drawing over on Gumroad. Together, nosotros can get over cartoon a face, different types of ears, mouths, noses, etc, in different views!
Back to the Blog

Source: https://doncorgi.com/blog/how-to-draw-faces/
Posted by: ellisphyan1939.blogspot.com
0 Response to "How To Draw Facial Features How To Draw Realistic Facial Features"
Post a Comment